Jun 26, 2022
In my last post (Hamshack Hotline Weather Alert ... in October, yikes!) I described the way I set up an extension on my asterisk server to play a stream of the local weather broadcast.
Since putting this system together, I've moved from a stream hosted online to one captured locally using an rtl_sdr dongle.
Set-Up
This replaces the 'Find a weather broadcast stream' part of my previous post, instead of using the URL of an external weather broadcast stream, I'm creating my own.
RTL_SDR Dongle and Antenna
I'm using a generic rtl dongle, these are a product originally intended to be used as a TV tuner for a market outside the US. Someone created drivers that allow it to be used as a fairly decent SDR (Software Defined Radio) to capture RF signals the original designers of the hardware never intended.
My rtl dongle is plugged into my server and passed through to one of my more multi-purpose VMs. The rtl gets a crudely made 2ish meter dipole made with a bnc to banana plug adapter, this is hung vertically down the back of a cabinet.
Software
This setup requires icecast2, ezstream, lame, and rtl_sdr to be installed
A script named wxstream.sh is placed in my /usr/local/share/ directory with contents:
#!bash
#!/bin/bash
rtl_fm -f 162.550m -M fm - 2> /dev/null | lame -r -s 24 -m m -b 24  --cbr - - | ezstream -c /home/tyler/kig98.xml
The rtl_fm command can be edited to change frequency to listen to whatever you're interested in capturing.
The xml file referenced in the previous script looks like this:
<?xml version="1.0" encoding="UTF-8"?>

<ezstream>

  <servers>
    <server>
      <hostname>127.0.0.1</hostname>
      <password>streampass</password>
    </server>
  </servers>

  <streams>
    <stream>
      <mountpoint>/KIG98.mp3</mountpoint>
      <format>MP3</format>
    </stream>
  </streams>

  <intakes>
    <intake>
      <type>stdin</type>
    </intake>
  </intakes>

</ezstream>
This could be named/edited for whatever makes sense for whatever stream is being captured.
A systemd service is created as /etc/systemd/system/wxstream.service with contents:
[Unit]
Description=KIG98 Stream
Wants=icecast2.service

[Service]
Restart=always
ExecStart=/bin/bash /usr/local/bin/wxstream.sh

[Install]
WantedBy=multi-user.target
Both icecast2.service and wxstream.service are enabled at startup in systemd.
With all this running, I have a mp3 stream of the live capture of KIG98 available at http://myserver:8000/KIG98.mp3 to which I can point an extension on my PBX.
Oct 02, 2021
My introduction to Chatbots, Asynchronous programming
One of my pet 'projects' is an online community (currently on Discord) called the Digital Oddballs Radio Club (DORC)
We're a group of hams who are into computers, programming and all kinds of other fun stuff. Being such a group, congregating in an online chatroom, I figured we needed an equally DORCy chatbot.
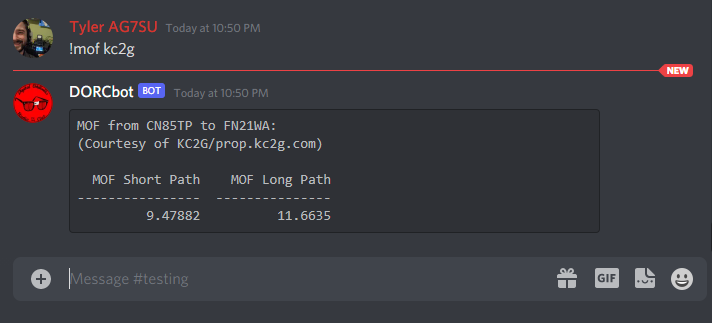
DORCBot sits in our Discord server, and accepts several different commands. DORCBot will tell you what the solar forcast is using the !solar command. DORCBot will also give you a list of the 5 most recent DORCs who were spotted/reported on the air by other hams, this uses data from one of my other projects.

DORCBot is meant to be a way for members of the club to bring their development projects into the chatroom.
Propagation, MOF
One of the neatest things that DORCBot will do uses an API and data model developed by one of our members. Andrew, KC2G's Propagation Site gives predictions of useable frequencies over the entire globe, it is an amazing project you should definitely check out.
DORCBot will grab data from Andrew's API to return the Maximum Observed Frequency between two stations. If you have your Discord display name in name_callsign format, any time you give a function that normally takes two callsigns as input only one callsign, DORCBot will assume you want to use your own callsign as the other argument, and pull it from your display name. This means that if I set my display name to Tyler AG7SU all I have to do to get a prediction of propagation to any other station/grid is issue the command !mof CALLSIGN or !mof GRID
Lessons, New Experiences
Before working on DORCBot I had had no experience with Github Actions, CI/CD or working on development projects with other people. Each of these have been great learning experiences for me.
CI/CD
DORCBot is a Python program, for ease of deployment it is running inside a docker container. When a commit is pushed/a Pull Request sent to the Github repository tests are run and a new docker image is built and tagged with the commit hash. This means that I can pull and test a specific commit/PR seconds after it has been pushed.
When a commit is pushed with a vX.X tag to the main branch A production docker image is built and tagged with the version number and also with latest
Using Watchtower on the server that runs the production instance of DORCBot means that not long after a new production image is built it is in production and available on our Discord server.
Chatbots
Before DORCBot, most of my limited programming experience has been with small command line programs, or with web applications, Flask in particular. A chatbot, at least the way I wrote DORCBot, is a lot like a command line application, it mostly ingests/outputs text. Instead of print statements to output text, however, everything has to go through an extra layer, integration with Discord's API.
More to Come
As part of being a place for DORCs to bring their projects together/into the chat room, DORCBot is under continued development. New features are being added whenever we think to do so.
Oct 02, 2021
What is PylogCQ, and why?
PylogCQ is a curses based TUI logging program for Amateur Radio use.
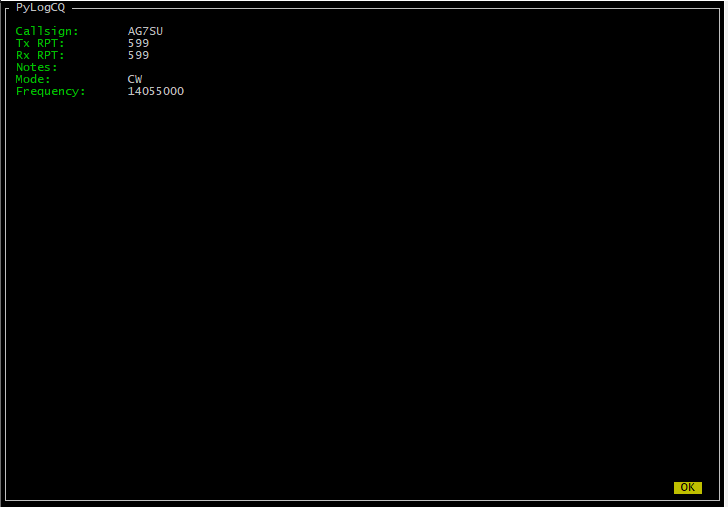
I started writing PylogCQ because I wanted a dead simple logging program that I could use from the command line, and remotely. PylogCQ uses the npyscreen library to build it's UI and Hamlib for CAT control.
Behavior
PylogCQ is meant to be simple.
PylogCQ exposes the cq endpoint when installed.
If no rig control arguments are passed to cq the TUI offers basic contact (QSO) information fields to the user for input.
Frequency and Mode input is retained between QSOs, PylogCQ assumes you haven't changed these things unless you tell it you have. PylogCQ will also assume a perfect 599 signal report both ways if nothing is input. QSO time/date are recorded at the time of logging. These all combine to result in extremely fast logging of QSOs, leaving the user free to work the radio and make contacts.
If a hamlib rigctld server is specified, as: cq -r 127.0.0.1 -p 4534 PylogCQ reads the frequency and mode from a connected radio.
PylogCQ writes each QSO to a running swap (recovery) file in JSON format, and converts that file to an ADIF on clean exit.
Installation
PylogCQ is available on the Python Package Index (PyPI)
simply:
python3 -m pip install pylogcq