Jun 26, 2022

Today I'm finally going to get around to describing the Four node chromebook cluster I built last year. I had always been interested in clusters, especially clusters built out of single board computers. Due to the price of amassing several machines to cluster, however, it never seemed all that viable of a thing to try.
The Minimum Viable Chromebook
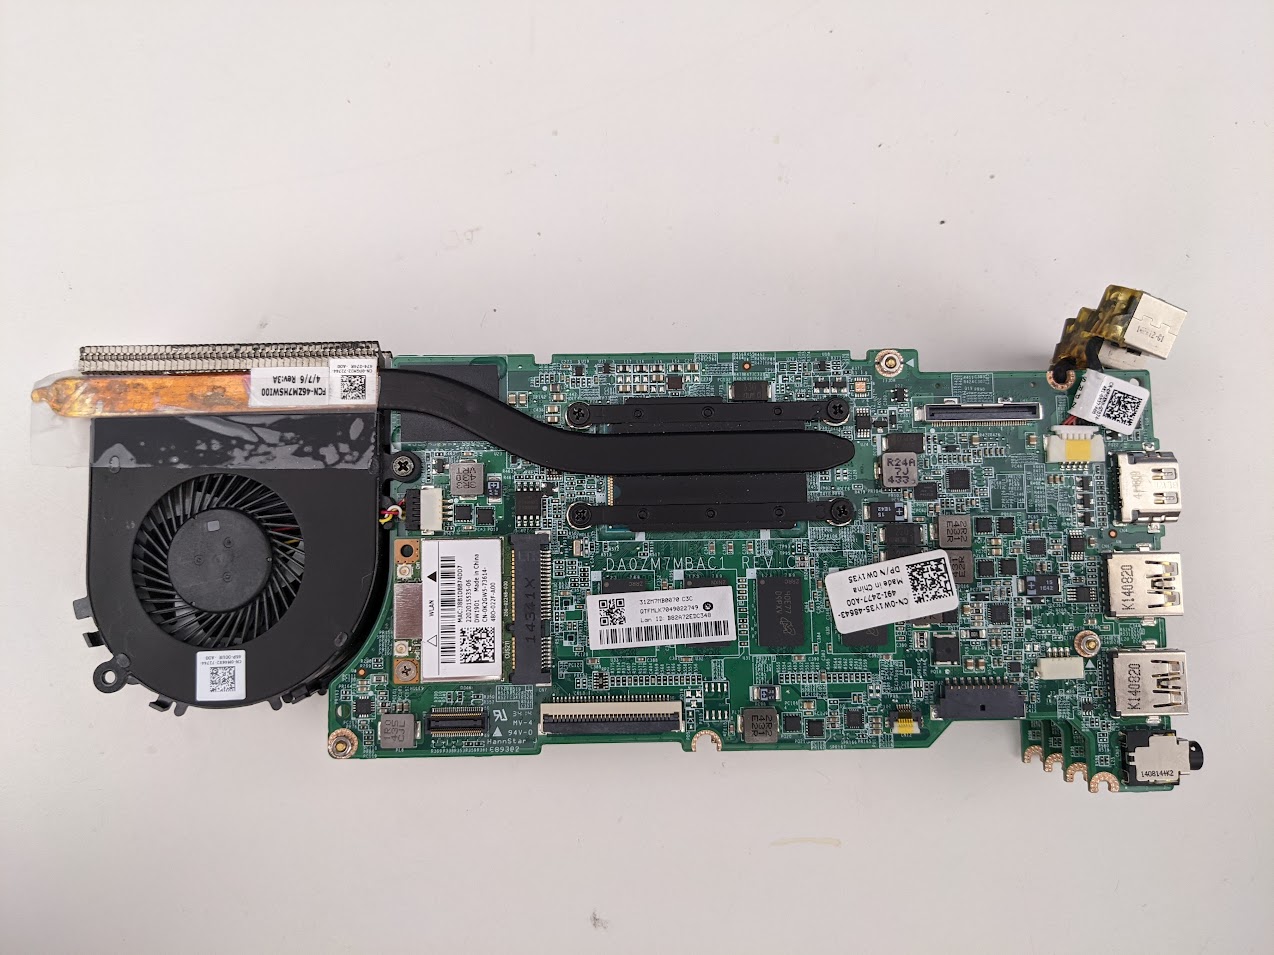
Last year some time, I came across several Dell Chromebook 11s that were being tossed. These devices had broken screens/keyboards/etc, and were no longer supported by ChromeOS. Because of this they were not worth fixing to be sold, and had no usefulness left for their intended purpose.

These Chromebooks (Dell CB1C13) have the following specs:
- Intel Celeron 2955U
- 4GB Ram
- 16GB SSD
My idea to build a cluster out of these started with an attempt to find what I called the 'Minimum Viable Chromebook.' I started stripping parts off of a Chromebook motherboard until it wouldn't boot anymore. With this model of Chromebook it turned out that, unlike some other models, the battery; keyboard; daughter-board; screen; and touchpad (basically everything except the motherboard) were all not necessary for the device to boot. These devices are actively cooled by a fan/heat pipe, and all of their connections once the daughter-board is removed are on one side, making them even more enticing for service in a cluster.
With all extraneous parts removed from my first subject (read: victim) I started working on installing linux on the device. There are really great instructions avavailable for this, making it a pretty simple process. The full set of instructions can be found on the Arch Wiki but it basically goes as follows:
- Enable developer mode
- Become root
- Patch the BIOS
- Boot installation media and install as normal, some hardware may not work... some hardware may not be present
I opted to install Arch linux on this first machine because I wanted to have a lightweight system and I had dotfiles already created to make a comfy but minimal environment. I dubbed this system the minimum viable chromebook, or Minnie for short.
When life gives you chromebooks... Cluster them!
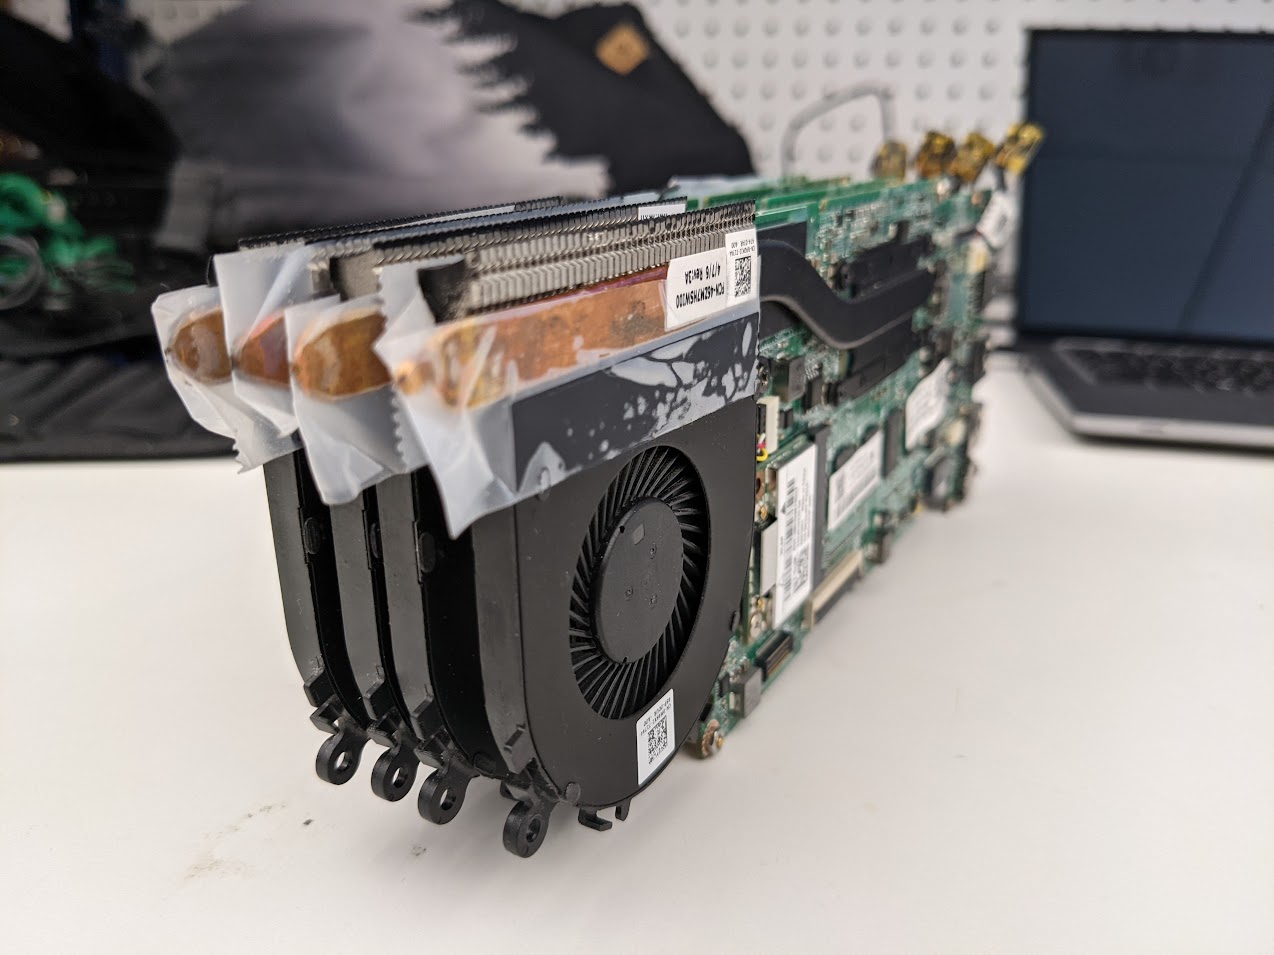
We ended up having a lot of these boards going into the dumpster. Since I was having fun installing linux on them, and I do one in a lunch break, I decided these might be my opportunity to build/experiment with a cluster.
Going with the theme set by Minnie soon I had Mickey, Goofy and Pluto.
The boards were all stripped, and their cooling fans mounted directly to the motherboard reusing screws and standoffs from the case it came out of. The boards were mounted to eachother using brass standoffs and screws.
Lets talk about the layout
Now that we're talking about four linux machines, we should start talking about network layout.
Since I did this work on my lunch breaks at my desk, and I didn't want this to actually be on our work network, I had to come up with a way for these machines to be able to be networked and to have access to the internet for updates/software downloads.
Minnie, being the first machine, became the controller node. Minnie had a comfy/lightweight desktop environment that made it a really nice entry point to the cluster. My solution to the networking issue is as follows:
- All nodes get a USB NIC
- Minnie gets a makeshift WiFi antenna (Ham radio trick, dipole made from the coax) and connects to the hotspot on my android phone
- Minnie runs a DHCP server on it's ethernet interface with NAT Masquerading
- Static leases and hostfile entries for each of the other nodes
Now all the nodes need is power, and a connection to a network switch in order to be networked with the others and also have access to the internet. This makes expansion of the cluster REALLY simple. Provision a node, plug it in, give it a static lease, done.
Software/OS provisioning on these devices is just like any other linux cluster. I went with what I think is a pretty standard beowulf cluster using Open MPI. I also ran these nodes in a docker swarm so workloads could be set up either way.
Okay... but what does it do?
I have no need for a cluster.
The whole point of this project was, because they were there and because I could. As such, I never really had any interesting workloads to run on this thing. The only workload that ever got deployed was a Monte Carlo Pi Estimation that served as a demonstration of "Look how bad the estimation is with one node, now it's not as bad with four nodes."
The cluster is now an 8-core 16GB of RAM paperweight, an interesting proof-of-concept though!
Jun 26, 2022
In my last post (Hamshack Hotline Weather Alert ... in October, yikes!) I described the way I set up an extension on my asterisk server to play a stream of the local weather broadcast.
Since putting this system together, I've moved from a stream hosted online to one captured locally using an rtl_sdr dongle.
Set-Up
This replaces the 'Find a weather broadcast stream' part of my previous post, instead of using the URL of an external weather broadcast stream, I'm creating my own.
RTL_SDR Dongle and Antenna
I'm using a generic rtl dongle, these are a product originally intended to be used as a TV tuner for a market outside the US. Someone created drivers that allow it to be used as a fairly decent SDR (Software Defined Radio) to capture RF signals the original designers of the hardware never intended.
My rtl dongle is plugged into my server and passed through to one of my more multi-purpose VMs. The rtl gets a crudely made 2ish meter dipole made with a bnc to banana plug adapter, this is hung vertically down the back of a cabinet.
Software
This setup requires icecast2, ezstream, lame, and rtl_sdr to be installed
A script named wxstream.sh is placed in my /usr/local/share/ directory with contents:
#!bash
#!/bin/bash
rtl_fm -f 162.550m -M fm - 2> /dev/null | lame -r -s 24 -m m -b 24  --cbr - - | ezstream -c /home/tyler/kig98.xml
The rtl_fm command can be edited to change frequency to listen to whatever you're interested in capturing.
The xml file referenced in the previous script looks like this:
<?xml version="1.0" encoding="UTF-8"?>

<ezstream>

  <servers>
    <server>
      <hostname>127.0.0.1</hostname>
      <password>streampass</password>
    </server>
  </servers>

  <streams>
    <stream>
      <mountpoint>/KIG98.mp3</mountpoint>
      <format>MP3</format>
    </stream>
  </streams>

  <intakes>
    <intake>
      <type>stdin</type>
    </intake>
  </intakes>

</ezstream>
This could be named/edited for whatever makes sense for whatever stream is being captured.
A systemd service is created as /etc/systemd/system/wxstream.service with contents:
[Unit]
Description=KIG98 Stream
Wants=icecast2.service

[Service]
Restart=always
ExecStart=/bin/bash /usr/local/bin/wxstream.sh

[Install]
WantedBy=multi-user.target
Both icecast2.service and wxstream.service are enabled at startup in systemd.
With all this running, I have a mp3 stream of the live capture of KIG98 available at http://myserver:8000/KIG98.mp3 to which I can point an extension on my PBX.
Oct 11, 2021
Introduction
Hamshack Hotline
Hamshack Hotline (HH) is a SIP phone system set up by a group of Amateur Radio Operators (hams). There are different use cases for HH, for me it is an excuse to run a PBX at home and play with phones.
My PBX
I run an instance of FreePBX in a VM on my main server (Dell R610) FreePBX is CentOS + Asterisk + a nice web UI.
Some of what I did to build my Weather Alert extension is done from the UI and some is done by manipulating Asterisk's config files directly.
Goal
My goal was to create an extension button on my hard phones (desk sets) that would play a stream of the local NOAA Weather Radio broadcast. I wanted the LED controlled by the Busy Lamp Field (BLF) for that button to light up with a specific pattern if there is a weather alert for my area. This would give me visual indication of potential hazardous weather affecting the area, and one press access to the weather broadcast to listen to.
How-To
For this how-to I will assume you are running FreePBX, I'm on version 15.0.17.55
Set up Music On Hold (MoH), queue and extension
Edit Config Files, Create Custom Device State
- Open
/etc/asterisk/extensions_custom.conf for editing
- add the following lines:
#!bash
[ext-local-custom]
exten => UNUSED_EXTENSION,hint,Custom:DEVICE
    same => 1,Goto(from-internal,ABOVE_EXTENSION,1)
Substitute:
- UNUSED_EXTENSION: Another unused extension
- DEVICE: Create a name for the Custom Device State
- ABOVE_EXTENSION: The Extension you created in the above section
example from my PBX:
#!bash
[ext-local-custom]
exten => 101,hint,Custom:WXAlert
    same => 1,Goto(from-internal,6000,1)
Install/Set-up control script
The control script queries NOAA's API for active alerts for a selected 'zone'
#!console
usage: wxalert [-h] -z ZONE -d DEVICE

optional arguments:
  -h, --help            show this help message and exit
  -z ZONE, --zone ZONE  NOAA Weather Zone
  -d DEVICE, --device DEVICE
                        Custom device state to target
If there is an active alert it will set the state of the device passed into it with the -d flag to an appropriate state for the highest severity of active alerts.
Source code for the control scipt can be found here
The fastest way to install the control script is to sudo pip install asterisk_wxalert
Once installed you can add an entry into the root user's crontab so the script runs regularly:
#!bash
*/5 * * * * /usr/bin/wxalert -z ZONE -d DEVICE
example from my PBX:
#!bash
*/5 * * * * /usr/bin/wxalert -z WAZ039 -d WXAlert
Your NOAA Forecast Zone can be found on this site
It will be in the form WAZ039 (2 Letter state, The letter Z, then the 3 digits from the map of your state above)
Phone Set-Up
Phone set-up will differ between phones, but for the most part, pointing one of your BLF buttons at the extension created in /etc/asterisk/extensions_custom.conf in my case 101 should get you the desired behavior. The BLF LED will illuminate with the status set by the control script, and pressing the button will call the extension that immediately forwards to the MoH Queue.
Conclusion
Hopefully this gets you at least part of the way toward a working implementation of this system. I will treat this as a living document, and will update it based on my own experiences and feedback from anyone who tries to follow the directions. Feel free to email me at the address listed on my QRZ page, or message me on the HH Discord server.
Thanks and 73, Tyler - AG7SU
Oct 02, 2021
My introduction to Chatbots, Asynchronous programming
One of my pet 'projects' is an online community (currently on Discord) called the Digital Oddballs Radio Club (DORC)
We're a group of hams who are into computers, programming and all kinds of other fun stuff. Being such a group, congregating in an online chatroom, I figured we needed an equally DORCy chatbot.
DORCBot sits in our Discord server, and accepts several different commands. DORCBot will tell you what the solar forcast is using the !solar command. DORCBot will also give you a list of the 5 most recent DORCs who were spotted/reported on the air by other hams, this uses data from one of my other projects.

DORCBot is meant to be a way for members of the club to bring their development projects into the chatroom.
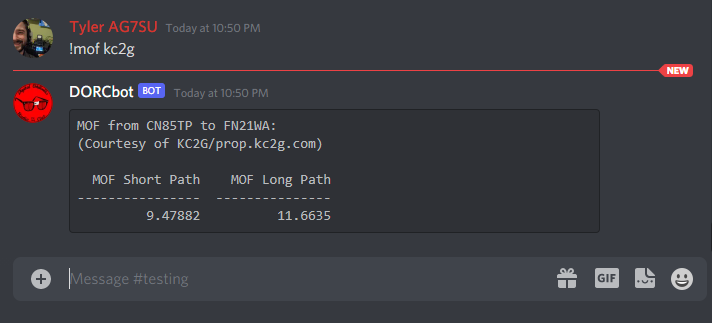
Propagation, MOF
One of the neatest things that DORCBot will do uses an API and data model developed by one of our members. Andrew, KC2G's Propagation Site gives predictions of useable frequencies over the entire globe, it is an amazing project you should definitely check out.
DORCBot will grab data from Andrew's API to return the Maximum Observed Frequency between two stations. If you have your Discord display name in name_callsign format, any time you give a function that normally takes two callsigns as input only one callsign, DORCBot will assume you want to use your own callsign as the other argument, and pull it from your display name. This means that if I set my display name to Tyler AG7SU all I have to do to get a prediction of propagation to any other station/grid is issue the command !mof CALLSIGN or !mof GRID
Lessons, New Experiences
Before working on DORCBot I had had no experience with Github Actions, CI/CD or working on development projects with other people. Each of these have been great learning experiences for me.
CI/CD
DORCBot is a Python program, for ease of deployment it is running inside a docker container. When a commit is pushed/a Pull Request sent to the Github repository tests are run and a new docker image is built and tagged with the commit hash. This means that I can pull and test a specific commit/PR seconds after it has been pushed.
When a commit is pushed with a vX.X tag to the main branch A production docker image is built and tagged with the version number and also with latest
Using Watchtower on the server that runs the production instance of DORCBot means that not long after a new production image is built it is in production and available on our Discord server.
Chatbots
Before DORCBot, most of my limited programming experience has been with small command line programs, or with web applications, Flask in particular. A chatbot, at least the way I wrote DORCBot, is a lot like a command line application, it mostly ingests/outputs text. Instead of print statements to output text, however, everything has to go through an extra layer, integration with Discord's API.
More to Come
As part of being a place for DORCs to bring their projects together/into the chat room, DORCBot is under continued development. New features are being added whenever we think to do so.
Aug 11, 2021
You can now submit comments when viewing an individual post. I wanted to add this just in case questions came up about a post, or if there were any corrections needed.
Comments are powered by a project called isso which is a self-hostable alternative to something like disqus
ISSO is running in a docker container on my main Linode instance. Because it uses a database and is not 'mission critical' and fails pretty gracefully I don't have it duplicated on mirror server(s). The system was pretty easy to set up, just a docker-compose file and a couple lines added to one of the templates in my pelican theme.
Leave a comment and tell me you're reading and we can see how this works!
Aug 11, 2021
Even though it isn't necessary, I decided to add an additional server to my Linode fleet. This server will, among other things, serve a mirror of this site.
I figured this would be a worthwhile learning excersize, and should provide more uptime which is never a bad thing.
Now, content is stored in a repo and pulled down, 'pelicanized' and the resulting html copied over to the mirror server, more detail on this here. The two VPSs are in different Linode datacenters (US-West and US-Central) and a Cloudflare load balancer sits in front of them to proxy requests. Depending on your geographic location you should be served either out of a nearby Cloudflare cache or the VPS that is nearest to you.
I can't give you back the time you spend reading my posts... but I can at least save you a millisecond or two.
Jun 21, 2021
I've been experimenting with self hosting, and hosting at home for several years now. My 'lab' has evolved significantly throughout the years, starting with the cheapest VPS I provider I could find I started learning things like remote access via ssh and basic security (often the hard way).
Eventually my lab moved into my home and onto an old roadkill laptop. I started learning about docker, reverse proxies, firewall rules and networking. Services in this era of my lab consisted of 'off the shelf' containers and some applications I wrote myself. Lots of Python, Flask and Docker. This 'server' (Carr-Lab1) is still running but hosts very little now.
In April of this year (2021) I convinced my wife to let me buy some old enterprise gear. This newest iteration of my lab consists of a second hand Dell Poweredge r610 [2x 6 core CPUs and 32GB of ram] running Proxmox as a hypervisor. With this new (to me) machine, I'm loving the hands on experience I'm getting with gear I don't normally get to play with at work. Services running on this machine are Homeassistant ('supervised' version in it's own Debian VM), hastebin, hedgedoc, plex, and babybuddy (we have our second daughter, Evelyn, on the way in July). A 5 node K3S kubernetes cluster is running with rancher as it's only current workload. I run a virtualized instance of pfSense on the server as well, which lets me better isolate lab VMs and reduces how much configuration I do on my main network in support of the lab.
My home network, which is also a semi-experimental component of my lab, runs behind a bare-metal installation of pfSense on netgate hardware (recently replacing a janky install on an atomic pi freeBSD support for realtek NICs bit me). I run VLANs for my main LAN (trusted devices), a guest LAN (untrusted, throttled), and a LAN for my IOT devices (REALLY untrusted, severely throttled). Due to where I live (rural), bandwidth is limited (3mbps/1mbps), throttling the IOT devices keeps an untimely update from interrupting youtube or other browsing. An app I wrote re-rolls displays and updates the guest LAN passphrase on my Aruba AP.